Introduction to Gluten-Free Sourdough Bread
Why Choose Gluten-Free Sourdough?
Choosing gluten-free sourdough bread opens a world of possibilities for those sensitive to gluten or living with celiac disease. Unlike many commercial gluten-free breads that can be dry or dense, sourdough’s traditional fermentation process brings out complex flavors and improves digestibility. This method leverages natural wild yeast and beneficial bacteria to create bread that’s not only safer for gluten-sensitive individuals but also delicious and satisfying.
Many people shy away from making gluten-free sourdough at home, intimidated by the idea that it’s complicated. However, with the right guidance and patience, baking your own artisan-style gluten-free sourdough is achievable and rewarding.
Health Benefits and Taste Profile
Gluten-free sourdough offers numerous health benefits beyond just being gluten-free. The fermentation process breaks down some compounds that might irritate the gut, making it easier to digest. Additionally, natural fermentation can increase the bioavailability of nutrients and reduce phytic acid, which otherwise inhibits mineral absorption.
From a taste perspective, gluten-free sourdough bread boasts a pleasantly tangy flavor with a crisp crust and moist crumb, offering a satisfying chew without the heaviness often associated with gluten-free loaves. The traditional starter and longer fermentation times allow flavors to develop deeply, making this bread a favorite among artisan bread lovers.
Essential Ingredients and Tools
Choosing the Right Gluten-Free Flours
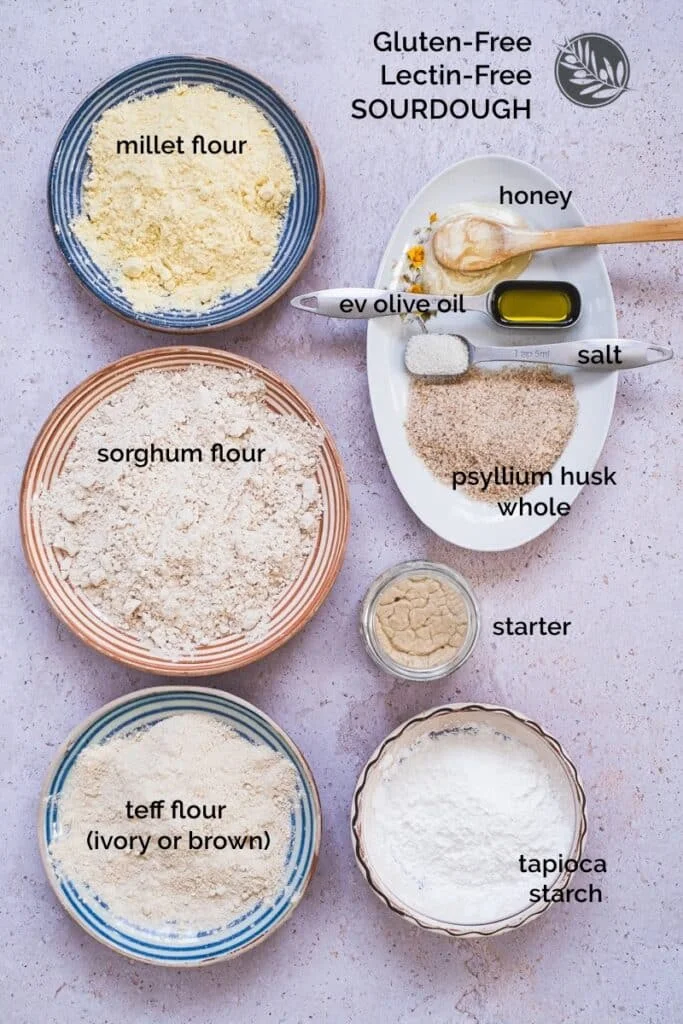
One of the foundations of a successful gluten-free sourdough loaf is selecting the right flours. Wholegrain gluten-free flours like brown rice, sorghum, and millet are excellent because they support the starter’s microbial activity and lend a nutty, wholesome flavor to your bread. Avoid premade gluten-free flour blends or starch-heavy mixes for your starter, as they tend to lack the nutrients needed for a healthy fermentation.
Combining a variety of these wholegrain flours often produces a balanced texture and flavor, with each contributing something unique. Experimenting with different ratios can help you find your perfect loaf.
Starter Components and Equipment Needed
To embark on your gluten-free sourdough journey, apart from the flours, you’ll want to have psyllium husks on hand. Whole psyllium husk—not powder—adds elasticity and helps bind the dough, which is crucial since gluten is missing. Also, consider acquiring certified gluten-free ingredients to avoid cross-contamination.
Essential tools include a digital kitchen scale for precise measurements, a large mixing bowl, and a whisk or stand mixer for combining ingredients. For baking, a Dutch oven helps trap steam and improve crust and oven spring, while a banneton basket or a high-temperature-safe bowl lined with a tea towel can assist with shaping. Lastly, a bread lame for scoring the dough will enhance the bread’s appearance and final rise.
Preparing Your Gluten-Free Sourdough Starter
Step 1: Mixing and Feeding Your Starter
Starting a gluten-free sourdough starter takes a little nurturing. Begin by mixing wholegrain gluten-free flour—such as brown rice or sorghum—with filtered water until you achieve a thick, pasty consistency. This consistency encourages the right microbial activity and bubbling, which can sometimes be subtle compared to wheat starters.
Feed your starter regularly, ideally twice a day on baking days, using fresh wholegrain flour and water. Mark the level of your starter with a rubber band or tape to easily track its growth. Consistency is key, so keeping your feedings steady helps build a lively starter over time.
Step 2: Signs of a Healthy Starter
A thriving gluten-free starter will exhibit small bubbles throughout and begin to rise noticeably after feedings, although it might not double as dramatically as wheat-based starters. It should smell pleasantly tangy or slightly fruity, not sour or off-putting. Tracking its growth daily helps you understand its rhythm, and maintaining a thick, pasty texture ensures proper fermentation.
Patience here is essential. Gluten-free starters can take longer to become fully active and consistent, but with attentive feeding and care, you’ll develop a powerful base to bake from.
Crafting the Dough: A Detailed Walkthrough
Combining Ingredients for Optimal Texture
When it comes to mixing your dough, accuracy matters. Using a digital kitchen scale, measure your starter, gluten-free flours, water, salt, and psyllium husks carefully. Psyllium husks act as the glue, providing structure and moisture retention, which is particularly important in the absence of gluten.
Incorporating heat-activated baking powder in small amounts can help maximize oven spring, giving your bread a lighter crumb. Choose fresh ingredients, and be mindful to avoid high-lectin flours like potato starch or quinoa, which aren’t suited for this baking style.
Kneading and Hydration Tips
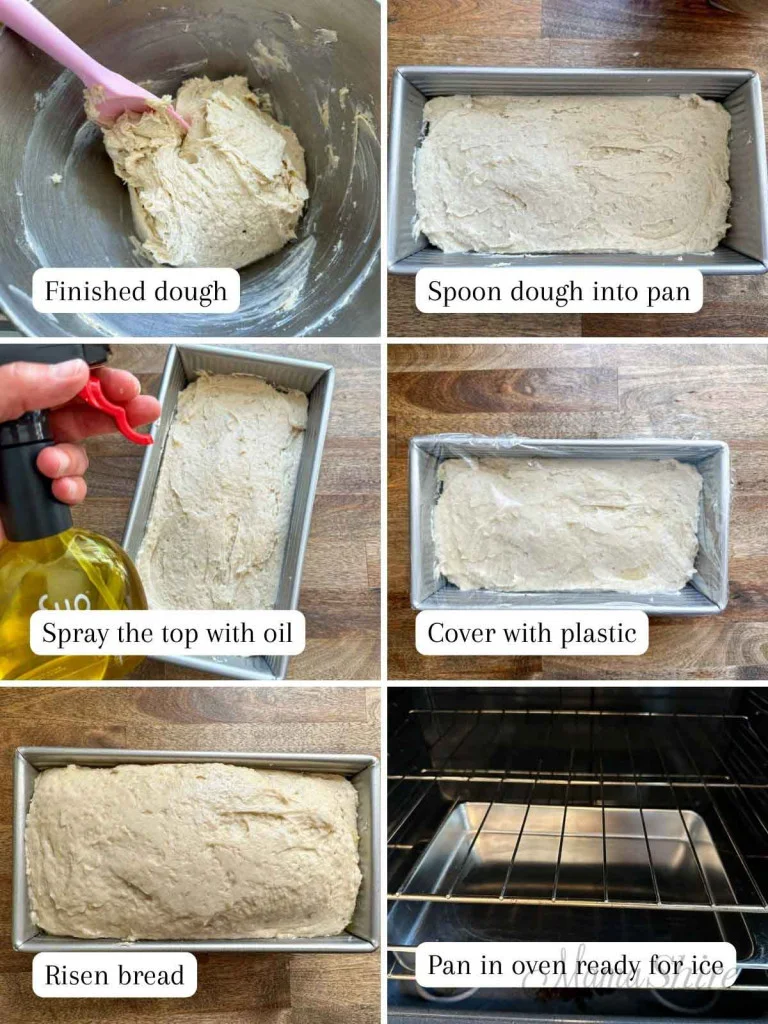
Kneading gluten-free sourdough differs from traditional bread. Typically, the dough will be stickier and wetter, which is normal. To avoid working with overly sticky dough, use a Danish dough whisk or a stand mixer with a paddle attachment to combine the ingredients thoroughly.
Hydration levels play a big role. Gluten-free doughs require more water to hydrate the flours and psyllium husks properly. Pay close attention to the dough’s feel rather than sticking rigidly to recipes, and expect some variation due to different flours’ absorbency. The goal is a dough that’s cohesive but still somewhat moist.
Fermentation and Proofing
Ideal Temperature and Timeframes
Fermentation is where the magic happens. Gluten-free sourdough prefers a warm, stable environment—ideally around 75°F to 80°F (24°C to 27°C). Bulk fermentation can take anywhere from 4 to 8 hours, depending on the starter’s vigor and ambient temperature.
To help maintain consistent warmth, you might use a proofing box or a warm spot in your kitchen. Remember that gluten-free starters usually ferment more slowly than traditional ones, so patience is your ally during this process.
How to Tell When the Dough is Ready
Determining readiness is more about observation than a strict timeline. The dough should have increased in volume and appear slightly puffed but may not double like wheat dough. A gentle poke test helps—if the dough springs back slowly but leaves a slight indentation, it’s ready for shaping. Over-proofing can weaken the structure, so monitor carefully.
Baking Process and Techniques
Prepping Your Oven and Baking Tools
Preheat your oven thoroughly with your Dutch oven inside to mimic a professional steam oven. This steam helps create a crisp crust and encourages oven spring, which is crucial for gluten-free sourdough’s rise and texture.
Prepare your dough for baking by transferring it carefully into the preheated Dutch oven, ideally using parchment paper to avoid sticking. Score the surface with a bread lame to guide expansion and produce the classic sourdough appearance.
Optimal Baking Times and Temperatures
Bake initially at a high temperature—around 450°F (230°C)—for about 20 minutes with the Dutch oven covered to trap steam. Then, remove the lid and bake for another 20 to 30 minutes to brown and crisp the crust.
The total baking time depends on loaf size and your oven’s characteristics, so watch for a deep golden crust and hollow sound when tapping the bottom. This ensures the bread is fully cooked without being dry inside.
Post-Baking Care and Storage
Cooling and Slicing Tips
After baking, it’s critical to let your gluten-free sourdough cool completely on a wire rack. Cooling allows the crumb to set, flavor to develop fully, and moisture to redistribute evenly. Resist the urge to slice too soon, as cutting warm bread can cause a gummy texture.
Once cooled, use a serrated bread knife and slice gently to maintain the loaf’s integrity and enjoy the delicious crust and tender inside.
Storing Your Gluten-Free Sourdough Bread
Gluten-free sourdough can be stored at room temperature in a breathable bag or bread box for up to two days without losing its freshness. For longer storage, slice and freeze portions wrapped tightly in plastic wrap or freezer bags. This helps prevent drying out and maintains quality for future enjoyment.
Troubleshooting Common Issues
Fixing Dense or Flat Bread
Dense or flat bread often points to issues with the starter’s activity or dough structure. Insufficiently fed or inactive starters result in poor rise. Make sure to feed your starter with wholegrain flours regularly and maintain a thick, pasty consistency to encourage healthy bubbling.
Also, skipping psyllium husks can result in weak dough that lacks elasticity. Incorporating full husks enhances structure and helps trap gases during fermentation, leading to better volume. Using a Dutch oven and scoring correctly further improves oven spring and final loaf shape.
Managing Sour Taste and Texture
If your bread tastes overly sour or has an off texture, consider adjusting fermentation times and starter feeding schedules. Longer fermentation produces more tang, while shorter times yield milder flavors. Keeping your starter healthy and consistently fed ensures balanced acidity.
Texture issues can also stem from hydration levels—too little water creates dry crumb, and too much leads to gummy results. Experiment gradually with water ratios and stick to reliable recipes while gaining experience.
Creative Variations and Recipe Tweaks
Adding Seeds, Nuts, and Flavor Enhancers
Once comfortable with the basic gluten-free sourdough recipe, experimenting with seeds, nuts, or aromatic herbs can elevate your bread. Toasted sunflower seeds, walnuts, or flaxseeds add delightful crunch and nutrition, while rosemary or thyme infuse fragrant notes.

Mix additions into the dough during the final mixing stage to ensure even distribution. This not only improves flavor but also enhances texture and visual appeal.
Making Sweet and Savory Versions
Gluten-free sourdough can be adapted for sweet or savory profiles. For sweet versions, add cinnamon, dried fruits, or a touch of honey to the dough. Savory loaves might include olives, caramelized onions, or roasted garlic for depth.
Always account for added ingredients in your hydration and baking time adjustments. These variations showcase the versatility of gluten-free sourdough and keep your baking adventures exciting.

